

 Tweet
Tweet
I know you're not suppose to try to remove wet sanding marks with a G100 but there's one spot where someone tried to fix a scratch (using dupli colors scratch fix 2 in 1) and ended up putting blobs of touch up paint and clear coat and now they're asking me if I can remove some of the touch up paint. I said no because I've never wet sanded before and do not own a rotary but considering it's one 1/2 in. x 2 inch spot, could I make it any better or would it just be making the problem worse or have no effect? I was looking into sanding blocks. I have a G100 DACP and Speed glaze, I hear you shouldn't use a cutting pad for the G100 either unless it's for a mf bonnet. Anyone have recommendations, they keep wanting me to at least try but I don't want to ruin anything. They said if it gets to bad they're just going to get the dealership to fix it. But I still don't want to ruin anything. It's a black Lexus btw and the sanding marks he left look bad, they are minor tho and fit in the 1/2 in x 2 in space. I think I could remove those but I couldn't remove the touch up paint w/ out wet sanding myself. Any recommendations will be helpful and if you think I should go for it but be careful then what procedure should I use, and what grit? I've watched the meguiars training video w/ the little section on wet sanding so I got the idea of it. It's just the removal of the sanding marks I'm afraid of because I don't have a rotary and have never used one.
- If this is your first visit, be sure to check out the FAQ by clicking the link above. You may have to register before you can post: click the register link above to proceed. To start viewing messages, select the forum that you want to visit from the selection below.
-
-
Here's an instance where we were successful with a G100
The dilemma is this, typically the touch-up paint will be softer than the clear coat finish around it, thus the sanding marks will polish easily out of the touch-up paint and you'll be left with sanding marks in the clear coat surrounding the touch-up paint.
The truth is, you never know how easy or difficult the sanding marks or any below surface defect is going to be to remove until you go out into your garage and try to remove it, whether by hand or machine. -
From the link I included above...
On the last page of the sign-up thread for this class, one of our forum member's, Nick, asked if he could attend this class even though he doesn't own a Corvette. We always open the classes to non-club members if the sign-up list doesn't fill-up and in this case it didn't. So we invited Nick to attend and he did driving his girlfriends Bug all the way up from San Diego!
Originally posted by 89sv21
Hey mike, I'm not a corvette owner but I'd love to drive up to Irvine for the clinic. Am I still able to sign up for the class at such short notice? If so, how much does it cost and is parking an issue? I'm coming up from San Diego so I'm going to leave early to make it on time. Thanks again.
Nick
That's Nick walking away from the Bug with Customer Care Rep Shane Lariba behind him helping to put things away.

The rear bumper on the Beetle had been damaged and Nick filled in the affected areas with touch-up paint and then sanded the area to smooth the paint out to more or less match the appearance of the surrounding paint. After sanding and then attempting to remove his sanding marks, he found he was able to remove them out of the touch-up paint, (soft paint), but he could not remove them out of the factory clear coat, (hard paint).
Thus one of the reasons for attending Meguiar's Saturday Detailing Class.
There were three areas he worked on, we took a picture but the sanding marks don't show up although they could easily be seen with the naked eye.

Meguiar's has always taught and continues to teach the philosophy of,
"Always use the least aggressive product to get the job done"
In keeping with the philosophy we decided to use the M80 Speed Glaze first, as this is a fairly light cleaner/polish plus it's very easy to work with. We know that if the M80 Speed Glaze proves to not be aggressive enough, we can always substitute a more aggressive product like the M83 Dual Action Cleaner Polish.

After a few, well worked passes, 95% of the sanding marks were gone!

The only marks that remained that were visible to the naked eye were so small that you had to know where to look to see them. Good work Nick! Nick was the last man standing and here's a shot of him leaving Meguiar's for San Diego...

Comment
-
Re: Removing touch up paint by wet-sanding and a G100 questions
Well, IMO it's always smart to turn down a job you're not confident about doing successfullyOriginally posted by F-150
It's a black Lexus btw and the sanding marks he left look bad, they are minor tho and fit in the 1/2 in x 2 in space. I think I could remove those but I couldn't remove the touch up paint w/ out wet sanding myself.. But anyhow...
Is this one of the single stage Lexuses (?"Lexi"?)? IIRC some of the black ones have either ss paint or a black-tinted clear. If it's the former, or if it's normal b/c paint, I'd tackle it, if it's the latter I'd let somebody else do it (no matter *how* much they tried to get me to do it). No way would I mess around sanding a tinted clear and I don't scare easily
IIRC the sanding blocks only get as fine as 2K. That's sorta at the edge of what you can do without a rotary, but I've removed 3K marks by hand on hard paint. So I'd rather use 3K paper than a 2K block in your case.
Different thought: Maybe consider the Langka "blob remover" stuff for the touch up paint. I've yet to try my bottle of it but that's what it's made for and a lot of people are pleased with the results. Stictly a chemical solution, nothing mechanical/abrasive.Practical PerfectionistComment
-
Hey Mike, what kind of sanding tools did you use? A sanding block or sand paper with a backing pad? And what grit?Originally posted by Mike Phillips
From the link I included above...
On the last page of the sign-up thread for this class, one of our forum member's, Nick, asked if he could attend this class even though he doesn't own a Corvette. We always open the classes to non-club members if the sign-up list doesn't fill-up and in this case it didn't. So we invited Nick to attend and he did driving his girlfriends Bug all the way up from San Diego!
That's Nick walking away from the Bug with Customer Care Rep Shane Lariba behind him helping to put things away.
The rear bumper on the Beetle had been damaged and Nick filled in the affected areas with touch-up paint and then sanded the area to smooth the paint out to more or less match the appearance of the surrounding paint. After sanding and then attempting to remove his sanding marks, he found he was able to remove them out of the touch-up paint, (soft paint), but he could not remove them out of the factory clear coat, (hard paint).
Thus one of the reasons for attending Meguiar's Saturday Detailing Class.
There were three areas he worked on, we took a picture but the sanding marks don't show up although they could easily be seen with the naked eye.
Meguiar's has always taught and continues to teach the philosophy of,
"Always use the least aggressive product to get the job done"
In keeping with the philosophy we decided to use the M80 Speed Glaze first, as this is a fairly light cleaner/polish plus it's very easy to work with. We know that if the M80 Speed Glaze proves to not be aggressive enough, we can always substitute a more aggressive product like the M83 Dual Action Cleaner Polish.
After a few, well worked passes, 95% of the sanding marks were gone!
The only marks that remained that were visible to the naked eye were so small that you had to know where to look to see them. Good work Nick! Nick was the last man standing and here's a shot of him leaving Meguiar's for San Diego...
Accumulator, I'm pretty sure it's a regular clear coat. It's a 2004 LS430. But I'll make sure. And I did decline, I'm just interested into doing a little research now.Last edited by F-150; Apr 26, 2006, 08:23 PM.Comment
-
Nick did the sanding down in San Diego, my part of this repair was in helping him to remove them using our products and the G100
I don't remember what grit paper he used or what brand, he hangs out on this forum so we could ask him.
If you venture forward with this project for your customer, I would stick with #2500 Grit Nikken, it's quite a bit less aggressive and slower than #2000 Nikken but better safe than sorry.
Also, first do a test spot on some paint in an inconspicuous area, away from the touch-up paint. Sand lightly and then see if you can remove ALL of the sanding marks.
I'm more in Accumulator's camp and that's to walk away from the request, especially if there's a chance that if you make a mistake you'll be buying a paint job.Comment
-
Smart moves, both declining and doing further research.Originally posted by F-150
Accumulator, I'm pretty sure it's a regular clear coat. It's a 2004 LS430. But I'll make sure. And I did decline, I'm just interested into doing a little research now.
I've heard *so* many different stories about Lexus black that I don't know what the real story is. Seems like even the "official word" from Lexus changes depending on who gets asked Practical Perfectionist
Comment
-
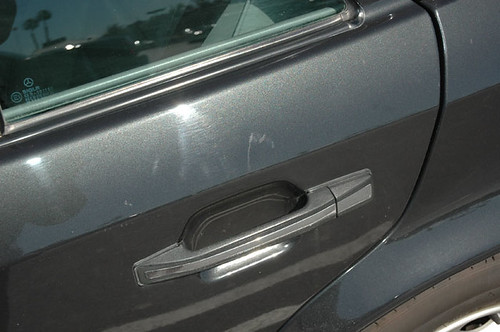
I recently did this very thing on a black 1992 Mercedes 500e. Presently on the 3rd owner. One of the previous ones had used touch up paint and did a really bad job. Some touchups obviously had a clear applied over it and some didn't. In many cases, I found lines of touchup paint that were really only two dings that needed touchup, but the person just connected the dots!
You can see the blobs above the door handle here, and yes the car has swirls, this was before I did any work
From this picture you can see that I wetsanded using 2500 grit sandpaper.
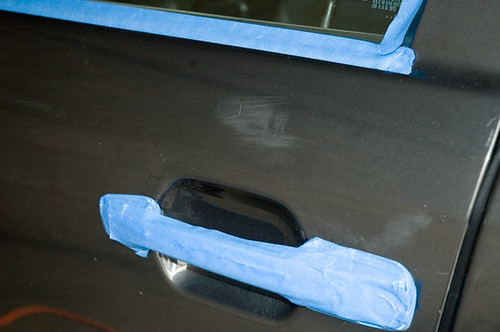
I initially tried it on a block, but I found that I wasn't able to get detailed enough and was sanding too much of the surrounding area. So I just ripped off a small piece, folded it in half for stiffness, and worked with that, constantly dipping it in water to keep it wet. Always work very gently as you'll have to remove those marks later!
Remember that trying to blend touchup on a metallic paint is very very difficult. In this case, the customer just wanted me to do my best to minimize the impact of those ugly touchup paint.
If I had wanted to remove the blobs altogether, I would have used Langka.
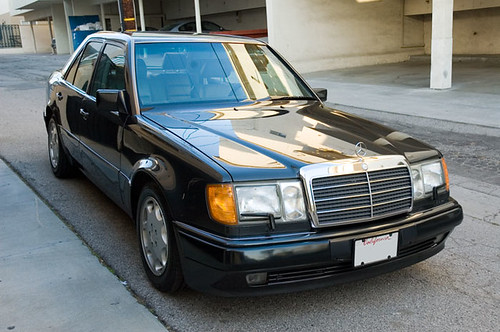
Here's the fully restored 14 year old car---restored in just 14 hours! LOL
I will be posting a writeup in the Extreme Makeovers shortly.
RichardLast edited by OctaneGuy; Apr 27, 2006, 01:48 PM.Comment
-
why not 3000 grit? it will take more time but won't the scratchs be easier to get out?Originally posted by Mike Phillips
Nick did the sanding down in San Diego, my part of this repair was in helping him to remove them using our products and the G100
I don't remember what grit paper he used or what brand, he hangs out on this forum so we could ask him.
If you venture forward with this project for your customer, I would stick with #2500 Grit Nikken, it's quite a bit less aggressive and slower than #2000 Nikken but better safe than sorry.
Also, first do a test spot on some paint in an inconspicuous area, away from the touch-up paint. Sand lightly and then see if you can remove ALL of the sanding marks.
I'm more in Accumulator's camp and that's to walk away from the request, especially if there's a chance that if you make a mistake you'll be buying a paint job.Patrick Yu
2003 Honda Accord
2008 Honda Accord EX-L V6
Comment
-
Glad to see you had good results OctaneGuy, I posted a thread similar to this a week or two ago. I'll be trying to do some small touchup, and then wetsand with 3000 unigrit to level to paint blobs.Comment
-
As long as you are proficient with a rotary buffer, it's not that hard. It only took a few touches of the RB set to 1500 rpm with a maroon cutting pad and M84 to remove the sanding marks, and of course that then leaves behind a machine buffing mark, which then needs to be removed.
I used the RB with a W8006 pad and M83 or M80 followed by the PC with M80 for finishing.
What I found was that on touchup paint with a clear, the edges blended in a lot smoother. On touchup paint without a clear, often times, the paint just came right out of the hole it was filling.
Richard
Originally posted by matt colvin
Glad to see you had good results OctaneGuy, I posted a thread similar to this a week or two ago. I'll be trying to do some small touchup, and then wetsand with 3000 unigrit to level to paint blobs.Comment
-
Oh!! Ok, I thought you had removed the sanding marks using a pc and probably #83.
That's what I was hoping to do. Wetsand just enough to level the paint blobs, then polish them back out with the #83 and my porter cable using an #8006 pad.
Mike had addressed the question pretty well, and we also own a couple other trucks that are very similar to mine. I might try on one of those first.
As I had told Mike, I got the idea from a thread on Autopia, where someone had excellent results trying this. But I do realize that my paint may not allow for the same results.
Thanks,
Matt ColvinLast edited by matt colvin; Apr 27, 2006, 02:03 PM.Comment
-
I apologize. I read the thread title after posting and realized this was using the G100 after wetsanding.
I haven't tried going directly from wetsanding to using the PC. But if Mike says it will work, I believe him!
Richard
Originally posted by matt colvin
Oh!! Ok, I thought you had removed the sanding marks using a pc and probably #83.
That's what I was hoping to do. Wetsand just enough to level the paint blobs, then polish them back out with the #83 and my porter cable using an #8006 pad.
Mike had addressed the question pretty well, and we also own a couple other trucks that are very similar to mine. I might try on one of those first.
As I had told Mike, I got the idea from a thread on Autopia, where someone had excellent results trying this. But I do realize that my paint may not allow for the same results.
Thanks,
Matt ColvinComment
-
Oh, no Mike didn't say it would work. He also didn't say it wouldn't, but just said that it was not something Meguiars endorsed doing. He had also seen the thread on autopia, and said basically that the hardness of my paint would govern whether or not it would be possible. Sorry for not being clear.
My threadComment
-
maybe dont sand, just fix touchup paint
Instead of wetsanding the touchup paint and surrounding factory paint/CC, there might be a much simplier solution.
Mothers *used* to sell a touchup paint "smoother" which removes excess touchup paint while not affecting factory paint. They discontinued it, but it is still available from Langka http://autogeek.net/langka-paint-chip-repair-kit.html
I bought 3 of the simplier Mothers kits when I heard they were being discontinued. Usually after I apply any touchup paint to my car, then next day I use the lotion (plus a white TShirt plus their plastic smoothing card) to remove excess touchup paint and just leave the fillin.
My understanding is that touchup paint (even though same color as factory) uses a different formula and that is how this system works. seems to work well.2010 XRSComment

Comment